Crochet Christmas Paw Print Ornament
A Cute Handmade Decoration for Pet Lovers
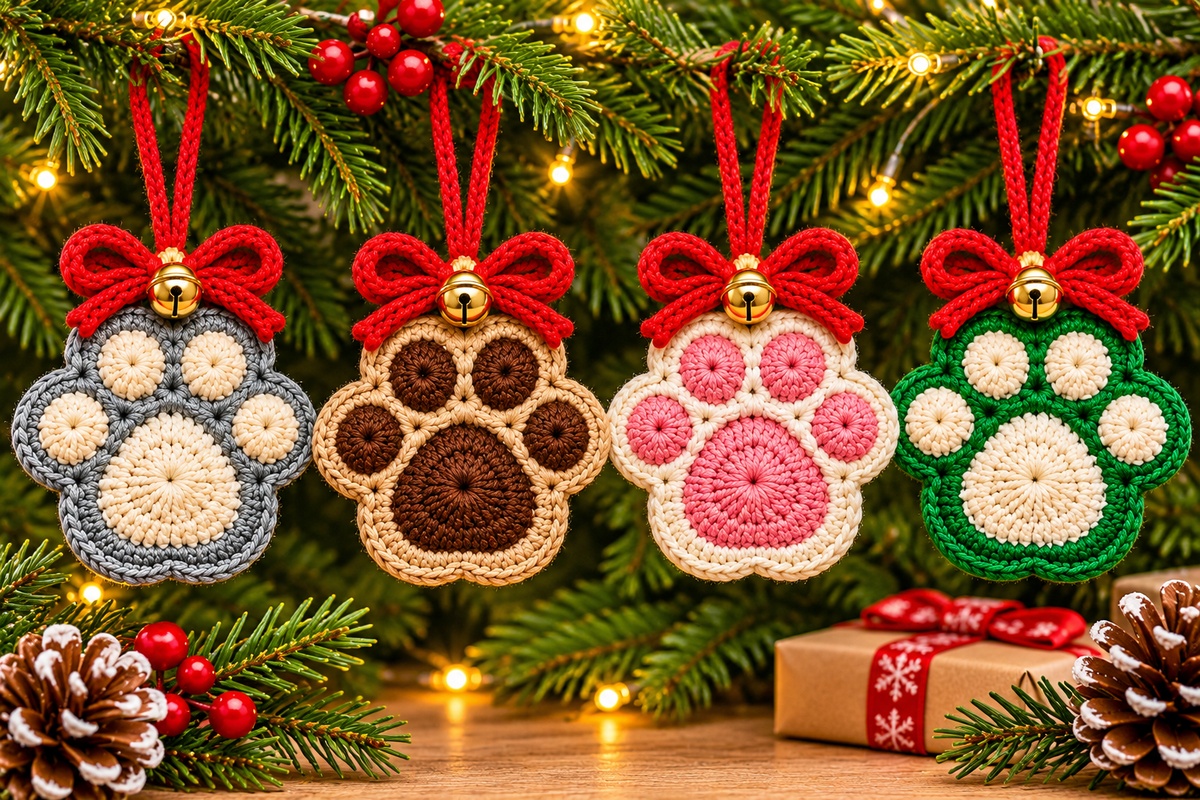
Looking for a Christmas crochet project that celebrates the special place pets hold in our hearts? This crochet paw print ornament is a sweet addition to a holiday tree, a thoughtful handmade gift for a cat or dog lover, or a small seasonal item to make for craft fairs and handmade shops. The paw shape, contrasting center pads, and little red bow give it a cheerful Christmas look.
The ornament is made from two matching paw-shaped pieces joined together for a fuller finish. A contrasting yarn creates the outline, while four small toe pads and one larger center pad form the familiar paw-print design. Finish it with a red hanging loop, a bow, and a small bell or gold bead for a festive touch.
Why You’ll Love This Crochet Paw Ornament
- Pet-inspired design: a charming way to celebrate cats, dogs, and the animal lovers in your life.
- Christmas-ready details: a red bow, a golden accent, and a hanging cord make it look right at home on a holiday tree.
- Color-customizable: choose classic Christmas colors or use shades that match your pet.
- Handmade-gift potential: it works as a small stocking stuffer, gift topper, keepsake, or craft-market item.
Materials
- Amigurumi yarn in bubblegum pink for the paw pads
- Amigurumi yarn in quarry gray for the outline
- Red yarn for the bow and hanging cord
- 1.50 mm crochet hook
- Tapestry needle and scissors
- Hot glue for joining the two paw pieces
- A small bell or golden bead for the center of the bow
The sample uses bubblegum pink and quarry gray yarn, with red yarn for the bow and hanger. You can keep that combination or choose a different palette to suit your Christmas decorations.
Abbreviations
- ch — chain
- sl st — slip stitch
- sc — single crochet
- hdc — half double crochet
- dc — double crochet
- tr — treble crochet
- inc — increase (work the indicated stitches into the same stitch)
Crochet Christmas Paw Print Ornament Pattern
Make two matching paw pieces. The first part forms the pink paw shape, the contrasting yarn is worked around it to create the outline, and the two finished pieces are joined together before adding the bow and hanger.
1. Make the Paw Center
Using the pink yarn, make a magic ring and chain 2. Work 12 double crochets into the magic ring. Close the ring by pulling the yarn tail, then join with a slip stitch.
For the next round, chain 2 and work a double crochet into the same space. Continue the increase sequence described in the video, working two double crochets into the same stitch for seven stitches. The next section shapes the paw: work a double crochet and a treble crochet into the next stitch; in the following stitch, work a treble crochet and a double crochet; then work two half double crochets into the next stitch. Continue with a double crochet and a treble crochet in the next stitch, followed by a treble crochet and a double crochet in the following stitch. Finish the round with a slip stitch into the first double crochet.
Lengthen the loop and cut the yarn. Pull the yarn end to the back, then insert the hook into the next stitch and pull the end through to help define the paw shape.
2. Add the Contrasting Outline
Join the gray yarn close to the stitch where the previous round ended. Chain 2 and work a half double crochet into the same space. Work a half double crochet in the next stitch, then two half double crochets into the following stitch. Repeat the increase-and-single-half-double-crochet sequence around the paw, as shown in the video. Join with a slip stitch into the first half double crochet.
Leave the gray loop on the hook or hold it safely while you make the toe pads. The gray outline will frame the pink paw and give it a neat, contrasting edge.
3. Crochet the Four Toe Pads
Pick up the pink yarn one stitch after the point where the gray round ended. Chain 2, then work six double crochets into the same stitch, for the seven-stitch group shown in the tutorial. Skip the small, hidden base stitch and make a slip stitch in the next stitch to finish the first toe pad.
For the next toe pad, yarn over, skip one base stitch, and work seven double crochets into the next stitch. Skip one base stitch and slip stitch into the following stitch. Repeat this process until you have made all four toe pads. At the end of the fourth toe, skip one base stitch, slip stitch into the next, then fasten off and pull the yarn end to the back.
4. Outline the Toe Pads in Gray
Put the gray loop back on the hook. Starting in the first double crochet of a toe pad, work two single crochets into the same stitch to make an increase. Work one single crochet in the next stitch, then an increase in the next stitch, followed by one single crochet. Continue the increase-and-single-crochet pattern across the toe pad as demonstrated in the tutorial.
At the slip-stitch area between toe pads, pull up a loop and work a single crochet. Repeat the same outline sequence around each of the four toe pads. When you reach the starting point, join with a slip stitch. Work slip stitches around the gray section of the paw until you reach the next toe, then finish at the last toe with a slip stitch. Fasten off and pull the yarn end to the back.
5. Make a Second Matching Paw
Repeat the same steps to make a second paw piece. Keep the two pieces as similar as possible so their edges line up when they are joined. Arrange the toe pads and outline before joining, and gently shape the curves with your fingers.
6. Join the Two Paw Pieces
Place the two paw pieces together. Apply hot glue to the toe pads first, taking time to shape each rounded section while the glue is still warm. Continue gluing along the lower part of the paw, pressing and shaping the edges so the two layers sit neatly together. Allow the ornament to cool and set before adding the decoration.
7. Make the Red Bow
With red yarn, leave a short tail and make a starting loop. Chain 40 stitches, then lengthen the loop and cut the yarn, leaving a small tail. Tie the ends close to the chain with two knots, trim the excess close to the knot, and secure it with a tiny drop of glue. Repeat on the other side as shown in the tutorial.
Shape the bow by forming one loop on each side. Adjust the loops so they are similar in size, cross the ends underneath, and wrap a short piece of red yarn around the center. Tie the ends securely at the back.
8. Attach the Bow and Hanging Cord
Position the bow at the top center of the paw, above the toe pads. Pass the bow threads through to the back and tie them securely. Use a tapestry needle to hide the knots inside the ornament. If you like the look shown in the sample, attach a small bell to the center of the bow; a golden bead is another decorative option.
Make another chain of 40 stitches for the hanging cord. Thread one end onto a tapestry needle and bring it through the center of the bow and out through the back of the paw. Repeat with the other end, arranging the chain into a loop of the desired shape. Tie the ends securely at the back and hide them inside the piece.
Color Ideas for Your Paw Print Ornament
The original color combination pairs bubblegum pink pads with a quarry-gray outline and a bright red bow. For a softer look, try ivory pads with a sage-green outline. Chocolate brown pads with a cream border create a warm, natural style, while forest green and ivory feel especially festive. You can also choose colors inspired by a beloved pet’s coat.
For a coordinated tree, make several ornaments in different paw-pad colors while keeping the same red bow and hanging loop. A small bell or bead in a matching metallic shade can tie the whole collection together.
Helpful Finishing Tips
- Shape as you go: gently adjust the toe pads and outer curves so the paw silhouette stays clear.
- Keep the two layers aligned: match the toes and edges before applying glue.
- Secure the decorative details: make firm knots at the back and hide the ends inside the ornament.
- Use glue carefully: apply small amounts and shape the edges while it is still warm, taking care not to touch hot glue.
- Personalize the finish: a tiny bell, gold bead, or a different bow color can make each ornament unique.
Frequently Asked Questions
Can I make this ornament in different colors?
Yes. The paw pads, outline, bow, and hanging cord can be made in colors that match your tree or your pet.
Is this a good handmade gift for pet lovers?
Absolutely. The paw-print shape makes it a thoughtful small gift for anyone who loves cats or dogs.
Do I need to make two paw pieces?
The tutorial joins two matching pieces to create a fuller ornament with a finished front and back.
What can I use instead of a bell?
A small golden bead is suggested in the tutorial as an alternative decorative accent.
How do I hang the ornament?
The tutorial uses a chain loop attached at the center of the bow and secured at the back.
Watch the Video Tutorial
Prefer to follow along visually? Watch the original step-by-step video to see how the paw shape, toe pads, gray outline, bow, and hanging loop come together.
Watch the Crochet Christmas Paw Print Ornament Tutorial
A Sweet Handmade Touch for Christmas
This crochet paw print ornament is a lovely way to add a personal touch to your holiday decorations. Make one for your own tree, create a small set for friends and family, or customize the colors to celebrate a favorite furry companion. With its rounded paw shape, cheerful bow, and little golden accent, it brings a handmade bit of pet-inspired charm to the Christmas season.