
Crochet Black Cat Applique Pattern
A cute Halloween crochet project for coasters, bags, sweaters, scarves, and garlands
About the Project
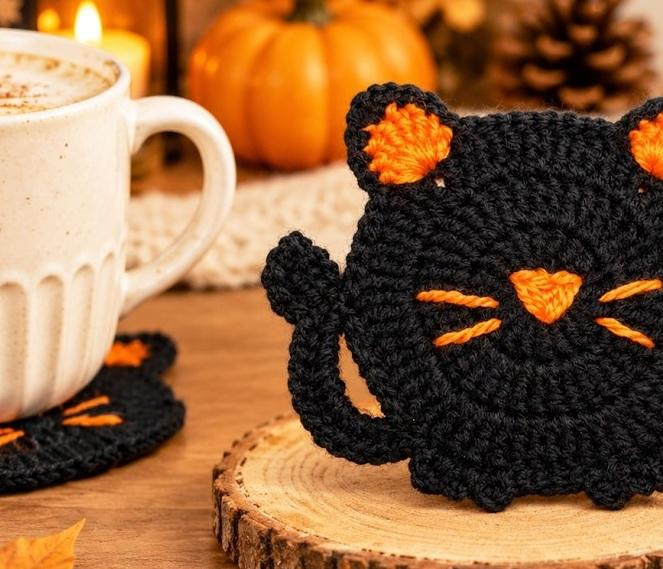
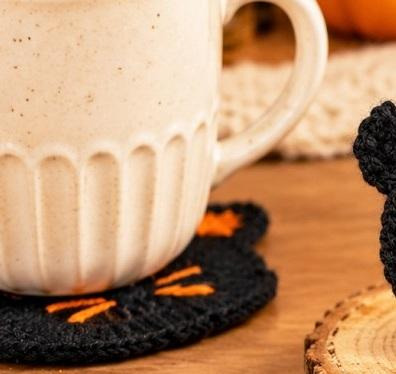
This small black cat applique is about 10 cm (4 inches) and can be used as a coaster, a bag or sweater applique, a scarf decoration, or part of a Halloween garland. The original tutorial uses 3-ply yarn and a 3.0 mm crochet hook. The sample uses black yarn with orange details, but you can choose other colors.
Materials
- 3-ply yarn
- Black yarn for the main cat
- Orange yarn for the inner ears, nose, and whiskers
- 3.0 mm crochet hook
- Yarn needle
- Scissors
Abbreviations (US Terms)
- ch = chain
- sc = single crochet
- hdc = half double crochet
- dc = double crochet
- tr = triple crochet
- sl st = slip stitch
- inc = increase (2 stitches in the same space)
- dec = decrease (work 2 stitches together)
The reference image also lists UK terms: ch = chain; dc = double crochet (US sc); htr = half treble crochet (US hdc); tr = treble crochet (US dc); dtr = double treble crochet (US tr); sl st = slip stitch. The steps below follow the US terms in the transcript.
Finished Size
Approximately 10 cm (4 inches). Different yarn and hook sizes can change the finished size.
1. Crochet the Cat Base
- Start with a magic ring.
- Round 1: 1 hdc plus ch 2 (count these as the first stitch), then 19 tr. [20 stitches total]. Join with a sl st on top of the first stitch.
- Round 2: in the same space, make 1 hdc plus ch 2, then 1 tr in the same space. In each of the next spaces, make 2 tr (an increase). The tutorial states 40 stitches total. Join with a sl st on top of the first stitch.
- Round 3: in the same space, make 1 hdc plus ch 2, then 1 tr in the same space. Follow the repeat shown on screen 19 times; the transcript also describes tr stitches and tr increases near the end. The tutorial states 60 stitches total. Join with a sl st on top of the first stitch.
EDITOR REVIEW NEEDED: the transcript refers to a repeat “written in the top left corner,” but that on-screen repeat is not included in the supplied text. Verify the exact Round 3 repeat in the video before publishing.
2. Crochet the Ears
- Pull up a large loop, remove the hook, and pick up the second color.
- Skip 1 stitch, then join in the next stitch.
- Make 1 hdc plus ch 1. In the same space, make 1 dc, 4 tr, and 2 dc. Fasten off.
- Pick up the first color and work over these stitches: make 3 sc.
- In the next stitch, make 1 hdc, ch 2, then 1 hdc in the same space.
- Make 3 sc. Back on the circle, skip 1 stitch and make 10 sl sts.
- Repeat the ear instructions for the other side: change to the second color, skip 1 stitch and join in the next, make hdc + ch 1, 1 dc, 4 tr, and 2 dc in the same space; fasten off. Return to the main color and work 3 sc, then hdc, ch 2, hdc in the same space, then 3 sc.
- Back on the circle, skip 1 stitch and make 7 sl sts. Mark this stitch, then make another 7 sl sts.
3. Make the Cat Tail
- Ch 10. Make 1 sl st in the marked stitch.
- Ch 6 and turn. In the first chain, make 4 tr, then 1 hdc in the same space.
- Work over the chains and make 14 hdc stitches.
- Back on the circle, skip 1 stitch and make 1 sl st in the next stitch.
- Repeat the tail/top-edge instructions indicated in the video 3 times. The transcript then lists: 1 sl st; ch 1 and 1 dc in the same space; ch 1 and 1 sl st in the same space, repeated as shown.
- Make 5 sl sts, then repeat the indicated instructions 3 times again.
- Make 16 sl sts and fasten off. Hide the yarn tails and shape the cat.
EDITOR REVIEW NEEDED: some tail repeats are described as text “written at the top,” but that on-screen text is absent from the transcript. Review the video around 18:46–21:56 to confirm the exact repeat sequence.
4. Embroider the Face and Finish
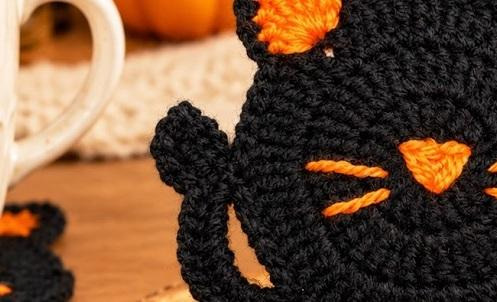
- Use orange yarn to embroider the nose and whiskers as shown in the video.
- Finish the face details and shape the applique.
- Weave in any remaining yarn ends.
Color Ideas
The original sample is black with orange details. Other visual options include black with pink, gray with pink, cream with black, or orange with black. These suggestions change only the colors, not the crochet instructions.
Watch the Video Tutorial
Watch the Crochet Black Cat Applique tutorial
Why You’ll Love This Crochet Black Cat
A small crochet applique can add a playful seasonal touch without requiring a large amount of yarn or a long list of supplies. This black cat has a rounded body, pointed ears, a curled tail, and bright facial details that make it easy to recognize as a Halloween-themed cat.
The video introduction gives the finished size as approximately 10 cm (4 inches). That compact size makes it suitable for projects where a large motif would feel bulky. Before attaching it to a finished item, place the applique on the surface and check that the size and position look balanced.
The original tutorial uses black yarn with orange details. That high-contrast combination gives the cat a classic Halloween look, but the same color placement can inspire other seasonal or everyday versions.
Ways to Use Your Finished Cat Applique
The creator mentions several possible uses for the finished cat: a coaster, a bag or sweater applique, a scarf decoration, or one element in a Halloween garland. Choose the use before attaching the piece, because the way it will be handled can affect how securely you want to fasten it.
For a bag or sweater, position the cat on the fabric first and check the placement from a short distance. If you are using it on a scarf, keep the applique placement comfortable and avoid putting bulky stitching where it might rub against the skin. For a garland, make several motifs and space them evenly along the hanging cord.
If you plan to use the cat as a coaster, keep the back as flat as possible and make sure the embroidered details and yarn ends are secured. The tutorial presents the cat as a versatile motif, so you can decide which finished use suits your project.
Choosing Colors for Your Cat
The sample shown in the tutorial uses black for the main cat and orange for the inner ears, nose, and whiskers. These contrast details help the face stand out against the dark body. The tutorial also says the project can be customized with favorite colors.
You can keep the same color placement while changing the palette. For example, black with pink details creates a softer look; gray with pink details gives the cat a muted appearance; cream with black details makes the face easy to see; and orange with black details leans into a bright Halloween palette. These are color suggestions only, not changes to the stitch instructions.
When substituting colors, make sure you have enough yarn for the main body and the smaller details. The exact amount depends on your yarn and tension.
Before You Begin
The video introduction recommends 3-ply yarn and a 3.0 mm crochet hook. It also notes that the finished cat is about 10 cm (4 inches). Your result may vary if you use a different yarn weight, hook, or personal tension.
Read through the listed materials and abbreviations before starting. The instructions below use US crochet terms, including hdc for half double crochet, tr for triple crochet, and sl st for slip stitch. Crochet terminology can differ between US and UK patterns, so keep the terminology list nearby if you usually follow UK terms.
A stitch marker can be useful for keeping track of a marked stitch, especially when you reach the tail section. Keep the contrast yarn nearby for the ear details and embroidery. A yarn needle will help with weaving in ends and adding the facial details.
Finishing and Attachment Tips
Once the crochet shape is complete, take a moment to arrange it before hiding every yarn tail. The cat’s ears and tail help define its silhouette, so adjust them gently and compare both sides before securing the ends.
The tutorial finishes by hiding the yarn tails, shaping the applique, and embroidering the details. Work slowly when adding the nose and whiskers so that the face remains balanced. If you are attaching the applique to another item, pin it in place first and check that it lies flat before sewing it down.
For a piece that will be handled often, such as a bag decoration or scarf accent, check the attachment points after finishing. Secure loose ends and make sure the applique does not have long strands that can catch on other items.
Frequently Asked Questions
How big is the finished cat? The tutorial introduction says it is about 10 cm (4 inches). Your finished size can vary with yarn, hook size, and tension.
What yarn and hook does the creator use? The video introduction specifies 3-ply yarn and a 3.0 mm crochet hook.
Can I change the colors? Yes. The creator says you can customize the project with your favorite colors. Keep the same color placement if you want the same overall look, or choose a different palette for another season.
What can I use the applique for? The creator suggests using it as a coaster, a bag or sweater applique, a scarf decoration, or part of a Halloween garland.
Are all the written repeats fully included in the transcript? No. Some repeat instructions are referred to as text displayed on screen, but that text was not included in the supplied transcript. Those places are marked for review in the pattern rather than filled in by guesswork. Check the linked video before treating those parts as a definitive written pattern.
Final Thoughts
This crochet black cat applique is a compact seasonal project with plenty of room for personal color choices. Use the written steps alongside the linked video, especially where the transcript refers to on-screen repeat instructions that were not included in the supplied text. Once finished, the cat can become a small Halloween accent, a gift embellishment, or part of a larger handmade decoration.