

Crochet Grinch Car Steering Buddy
A Mischievous Christmas Amigurumi for Your Car
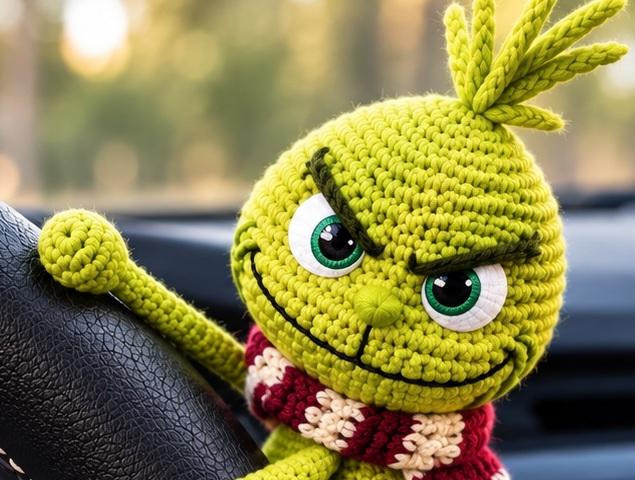
Add a little holiday mischief to your daily drive with this crocheted green Christmas steering buddy. With a round expressive face, embroidered features, long arms and legs, and a striped red-and-cream scarf, this playful amigurumi makes a fun seasonal decoration for a parked car or a handmade gift for someone who loves Christmas crafts.
The design is built from a crocheted head and body, small arms and feet, a tuft of hair, and a narrow scarf finished with fringe. Embroidered eyes, brows, a nose, and a cheeky smile bring the character to life. The arms and legs are attached so the figure can sit around a steering wheel, while a long crocheted chain can be adjusted to suit the wheel.
Why You’ll Love This Crochet Car Buddy
- A fun Christmas character: its mischievous expression and festive scarf make it stand out from ordinary car decorations.
- A handmade gift idea: make one for a friend, family member, or anyone who enjoys seasonal amigurumi.
- Customizable details: change the scarf colors, hair tuft, or facial expression to give your buddy a different personality.
- A project with several techniques: the tutorial combines amigurumi shaping, embroidery, crocheted limbs, and a striped scarf.
Materials
- Green 100% cotton yarn for the head, body, arms, and legs
- Dark yarn for eyebrows and facial outlines
- White or off-white yarn for the eye details
- Red and white or cream yarn for the scarf
- 1 mm crochet hook
- Safety eyes in a suitable size
- Polyester fiberfill
- Tapestry needle and scissors
- Optional strong magnets for the hands and feet, if desired
The tutorial uses a 1 mm crochet hook and cotton yarn. The creator also mentions optional magnets in the hands and feet, while fiberfill can be used to stuff the small parts. Choose finishing materials that are appropriate for how you intend to display the finished figure.
Abbreviations
- MR — magic ring
- ch — chain
- sc — single crochet
- hdc — half double crochet
- inc — increase (two stitches in the same stitch)
- dec — decrease
- sl st — slip stitch
Crochet Grinch Car Steering Buddy Pattern
The written overview below follows the order of the video: make the head, embroider the face, continue into the body, crochet the limbs and steering-wheel chains, then finish with the hair and scarf. Use the linked tutorial alongside the instructions to see the placement and shaping.
1. Crochet the Head
Using green yarn and the 1 mm hook, begin with a magic ring and work 6 single crochets into it. For the next round, increase in every stitch to reach 12 stitches. Continue with the increase rounds shown in the tutorial, first alternating one single crochet and an increase, then working the following shaping rounds to build the head. The tutorial uses a sequence of increases and plain single-crochet rounds to create the rounded shape.
As the head grows, work the shaping round that widens the face and then repeat that round for the additional rounds shown in the video. Insert the safety eyes at the placement demonstrated in the tutorial, leaving four stitches between them. Secure the backs of the eyes before continuing.
Shape the lower part of the head with the decrease rounds shown in the video. Before closing the head completely, add fiberfill so the face holds its rounded shape. Keep the stuffing even rather than packing it so firmly that the stitches stretch.
2. Embroider the Facial Features
Use white or off-white yarn to embroider the eye surrounds. The tutorial forms a triangular outline around each eye, working the yarn over the same area more than once so the white detail looks full. Add a green line beneath the eyes to give the face its distinctive expression.
Use dark green yarn to embroider the eyebrows, making each brow wider than the eye and angling it to create a mischievous look. Add a small triangular nose below the eyes, then embroider the smile with black yarn. Finish by outlining selected edges of the eyes, nose, and eyebrows with thin black yarn or thread to make the features stand out.
3. Continue from the Head into the Body
After the face is complete, continue crocheting the body in green yarn. The tutorial increases the stitch count over several rounds to form the upper body, then works multiple plain rounds to create its length. Follow the round-by-round sequence in the video for the shaping and stitch counts.
Begin decreasing toward the lower body to taper the shape. Add fiberfill before the opening becomes too small, then continue decreasing until the body is closed. Weave in the yarn end neatly.
4. Make the Arms and Hands
For each hand, begin with a small ring and work 5 single crochets into it. Increase in each stitch on the next round to make 10 stitches, then repeat that round once more. Add a small amount of fiberfill or an optional strong magnet, as described in the video, and decrease to close the hand.
From the hand, crochet a long chain for the arm and steering-wheel attachment. The creator suggests approximately 30–36 chain loops, or adjusting the length to fit the steering wheel. Fasten off with a sewing tail and hide the yarn end neatly. Make a second matching arm and hand.
5. Crochet the Feet and Legs
Start each foot with a magic ring and 6 single crochets. Repeat the six-stitch round for the additional rounds shown in the tutorial to create a small, rounded foot. Add a little fiberfill or an optional magnet before shaping the foot.
Work the shaping round with single crochets and half double crochets as demonstrated, then make the decrease round to form the foot. Crochet a long chain for each leg; the video shows a chain of 32 stitches. Fasten off, leaving a tail for sewing, and lightly stuff the feet before closing any remaining opening.
6. Attach the Arms and Legs
Position the legs near the lower part of the body and sew them securely in place. Attach the arms at the sides so they can reach around the steering wheel. Before finishing the sewing, check the placement from the front and adjust both sides so the figure sits evenly.
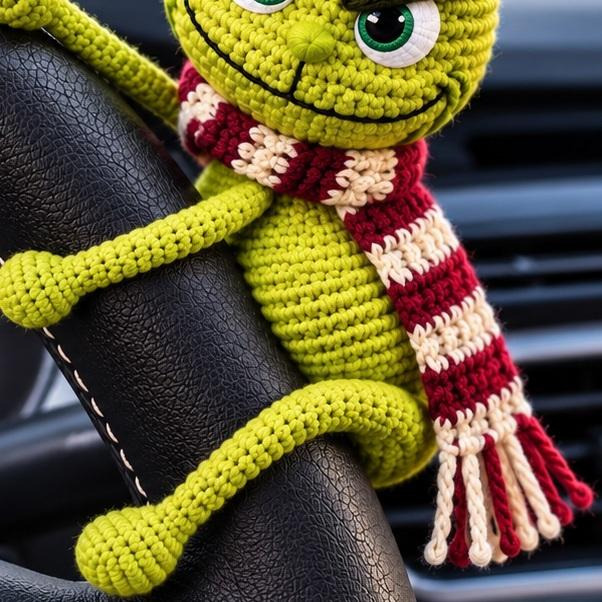
Arrange the long chains so the buddy can be positioned around the wheel when the car is parked. Keep the figure clear of the driver’s view and all vehicle controls. Remove it before driving if it could interfere with steering, airbags, or safe operation.
7. Add the Hair Tuft
Use green yarn to create the small tuft at the top of the head. Arrange the strands into pointed locks and sew them firmly to the crown. Trim or shape the ends so the tuft looks neat and adds to the character’s playful silhouette.
8. Crochet the Red-and-Cream Scarf
Begin with white or cream yarn and chain 5. Work half double crochets across the chain as shown in the tutorial. Change to red yarn, chain 2, and continue the short row pattern, alternating red and cream while carrying or hiding the unused color behind the work. Keep the color changes consistent to create the striped scarf.
Repeat the color sequence for the length shown in the video. At the end, cut short lengths of yarn and attach them along the ends to create fringe. Fold the scarf around the neck and sew it in place so it sits naturally against the body.
Color and Styling Ideas
Classic lime green with a bright red-and-cream scarf gives this holiday character a festive look. For a more muted version, try olive green with burgundy and cream. A forest-green body with a red scarf creates a traditional holiday palette, while a deep red scarf with ivory stripes can make the facial details stand out.
You can also personalize the expression by adjusting the angle of the embroidered eyebrows and smile. Small details make a big difference: take time to position the eyes evenly, keep the scarf stripes tidy, and secure the hair tuft so it keeps its shape.
Helpful Finishing Tips
- Stuff gradually: add small amounts of fiberfill as the head and body take shape so the surface stays smooth.
- Place facial features before finalizing embroidery: check the expression from the front before securing every thread.
- Keep the limbs balanced: compare the length of both arms and both legs before sewing them to the body.
- Hide yarn ends carefully: use a tapestry needle to weave tails into the crocheted fabric.
- Think about safe placement: use this as a parked-car decoration and ensure it cannot obstruct visibility or vehicle controls while driving.
Frequently Asked Questions
What hook size does the tutorial use?
The creator uses a 1 mm crochet hook with 100% cotton yarn.
Can I change the scarf colors?
Yes. The scarf is made by alternating two yarn colors, so you can choose a palette that suits your style.
Is stuffing needed?
The tutorial uses fiberfill to help shape the head, body, and small parts.
Are magnets required?
No. The creator presents magnets as an optional choice; the small parts can also be lightly stuffed.
How long should the steering-wheel chain be?
The tutorial suggests 30–36 chain loops for the arm attachment and a chain of 32 for each leg, with adjustments according to the intended fit.
Can I leave it on the steering wheel while driving?
For safety, use it as a decoration only when the car is parked. Remove it if it could interfere with steering, visibility, airbags, or vehicle controls.
Watch the Video Tutorial
Follow the original video to see the face embroidery, body shaping, limb placement, and striped scarf being assembled step by step.
Watch the Crochet Car Steering Buddy Tutorial
A Playful Christmas Companion
This crocheted car steering buddy is a cheerful seasonal project for anyone who enjoys amigurumi and festive handmade decorations. With its expressive face, long limbs, and cozy striped scarf, it makes a memorable Christmas gift or a fun addition to a holiday craft collection. Choose your favorite yarn colors, take your time with the embroidered details, and enjoy bringing this mischievous little character to life.